Summary
Importing Account and Contact data from an external CSV file is an administrator function. Begin by ensuring your file contains at least the Company Name, Contact First Name, and Contact Last Name for every row. Refer to the related article for more details about how to prepare your file for import. A sample CSV file is available as an attachment to this article.
When you are ready to import the file, open the Administrator menu and select System Tools - Account Import. More detailed instructions follow.
More Information
Follow these steps to import data from a text file. Note the file containing your data must be saved as either CSV (also known as comma delimited format) or TXT (also known as Text TAB delimited) before starting the Import Wizard. Your data file can typically be opened and modified in Excel then saved as either format. TAB delimited is the preferred format because it allows some commas within the data.
Start the Data Import Wizard
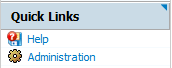
Login to Commence OnDemand as the administrator. Then go to the Administration area found under Quick Links.
You will now see the System Tools found under the Administrator menu.
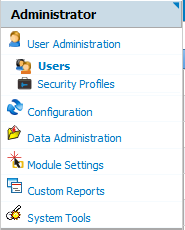
Open the System Tools menu to expand the list of choices. System Tools give you the ability to import Account data from disparate sources and is also where territory realignments are performed.
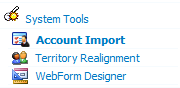
Select 'Account Import' to view all the existing Account lists that have previously been created. Take note of the number of Accounts already in each list (the Account Count column). You will have the option of adding to one of these lists or creating a new list.
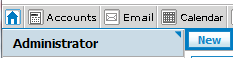
Click the New button to begin.
The import wizard starts and opens the first window
Data Import Step 1
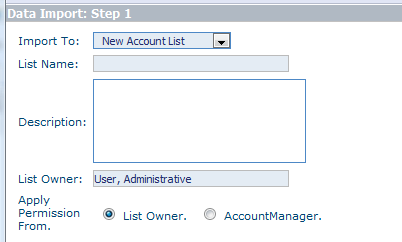
IMPORT TO: Choose a saved Accounts list from the drop-down if you wish to add to or reuse an existing list. Any accounts that were previously imported or moved to this list will remain and the newly imported accounts will be merged into the list.
Or create a new Account list by entering a list name and description. The new list will contain 0 Accounts to start, making it easy to find and work on just your newly imported accounts.
- LIST NAME: Enter a new list name that has not been used before; do not use any apostrophe or quote marks in the list name
- DESCRIPTION: Enter a brief note to describe the new list, such as 'East Coast Regional Accounts'
LIST OWNER: Take note of the list owner and change this as needed. Choose the List Owner carefully; this indicates who CREATED the record and cannot be changed later. The List Owner is also known as the Record Owner. The user's name should be entered exactly as it is shown in Commence OnDemand, typically 'Last First'.
APPLY PERMISSION FROM
- List Owner: View/modify/delete rights are granted to the List Owner for newly imported accounts. Once an Account Manager is assigned, the Account Manager permissions take precedence over Record Owner permisions.
- Account Manager: If you select this button, there must be a column in your file that contains the Account Manager name. For example open any account detail where the account manager has been assigned. If the Acct Mgr appears as "Last, First" in Commence then the column in your CSV file should be 'Last First' without the comma.
Select the NEXT button when you are ready to continue.
Data Import Step 2 for CSV files

FIELD SEPARATOR: Type a comma "," to identify the field separator for a CSV type of file.
LINE SEPARATOR: In most cases this is the new line character so check the box for Line Return.
HEADER ROW: Choose yes or no to whether the first row of your spreadsheet contains field names…an example of this would be (first name, company, address 1, etc.).
UPLOAD FILE: At this point, you are ready to choose the file upload path where your CSV file resides. Click the Browse button to find your saved file.
VALIDATIONS:
- Allow Duplicates means every row in the CSV file will be added as a new contact record and new account record, with a one to one match.
- Choosing Merge Duplicates will replace the company data whenever an existing company record is found with the same name. A new contact will also be added for every row in the CSV file.
SAVED MAPPINGS: You may choose the Default Account Import Mapping if you have prepared a CSV file to match. Refer to the related article: "Prepare your file before importing Accounts from CSV". If you prefer to create a custom field map for your file, click NEXT to open the mapping page (Data Import: Step 3).
Tip - Commence On-Demand gives you the ability to SAVE a mapping that you have completed. The next time you do your import, you can select the name of your saved mapping from the drop-down box. This will skip the mapping process and speeds up the imports if you have multiple CSV files with the same format. At the bottom of the mapping page is where you can save a default mapping for future use.
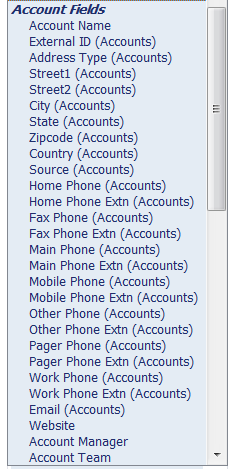
Data Import Step 3
The last step is to MAP the database fields. This is as easy as matching up the field name on the left with the value from the drop downs on the right (first name = first name, phone number = phone number, and so on). If you did not have a header row in your file, then data from the first row of your file will be shown on the left side.
Data Import Step 4
Select the NEXT button and your file will be imported. A confirmation message will tell you the number of records that were successfully imported.
If you receive an error message, refer to the related article to find any problem areas in your import file.
Applies To
| Author: |
Commence |
| Tracking ID: |
|