Summary
A CSV file will not import properly if the file contains unsupported characters, or if any of the mandatory field values are blank. There are also limits to the number of columns supported in a file. Use the information below to review your file for common problems and to make the necessary corrections before importing your data to Commence OnDemand.
More Information
Check your CSV file for each of the common issues described below.
Minimum required columns
Make sure your file contains a column for the Company Name. The Company Name must not be blank for any row. This is the minimum requirement to successfully import into Commence OnDemand.
If there is a contact, make sure your file contains columns for both a First Name and a Last name. Both fields must be filled to successfully create a contact. If there is no contact, both the First and Last name may be left blank.
To check your file for missing data, open the CSV file in Excel then sort by each of the columns listed above. Any rows with a blank value will come to the top. Put some value such as 'unknown' so that these records are not left blank.
Special characters
Special characters of comma (,) quotation mark, and new line character may cause issues with a CSV import. If you get an import error, open the CSV file in Excel and use the Find & Replace tool to change or remove these specific special characters. Then retry the import.
Apostrophe/Single Quote
Values with an apostrophe or single quote mark (') must be contained in double quotes. Put double quote marks at the beginning and end of the field value. For example, a field value of "Toy's R Us" is allowed when surrounded by quotes as shown.
Commas
Commas are not allowed within some fields. Replace commas (,) with a semicolon (;) or simply remove them from the CSV file before saving. For example an account name of "My Company, Inc." or a contact last name of "Surname, Jr." is not supported.
Double quotes
Replace double-quotes (") with another character such as left/right arrows (< or >). Double quotes are not allowed within the field value.
Line Breaks
New line characters such as those found in multi-line addresses and note fields are not allowed.
Below is an example of a valid CSV file that can be imported successfully. Note that the data containing an apostrophe is surrounded by double quotes.
test company, first1, last1 name
"test2's company", first2, last2
test3 inc., first3, hyphenated-lastname
Contact websupport@commence.com if you have any questions about how to best handle special characters.
Maximum number of rows
You may import up to 5000 rows per file. If you have more then 5000 records to import, split the file into smaller files and import each file separately.
Maximum allowed columns
To streamline your CSV file for import, look for columns of information that you do not wish to import, or columns where the data is blank for all or most records. These unused columns should be removed from the file.
Your CSV file can include data for any of the basic account and contact fields listed below. Additionally, dozens of Custom Fields may be appended as needed. However hundreds of columns are difficult to manage and would likely exceed the database limits.
See below for a list of basic fields that may be imported. If you do not see a field you need below, contact websupport@commence.com for assistance with adding custom fields.
Account Fields
Account Name, External ID (Accounts), Address Type (Accounts), Street1 (Accounts), Street2 (Accounts), City (Accounts), State (Accounts), Zipcode (Accounts), Country (Accounts), Source (Accounts), Home Phone (Accounts), Home Phone Extn (Accounts), Fax Phone (Accounts), Fax Phone Extn (Accounts), Main Phone (Accounts), Main Phone Extn (Accounts), Mobile Phone (Accounts), Mobile Phone Extn (Accounts), Other Phone (Accounts), Other Phone Extn (Accounts), Pager Phone (Accounts), Pager Phone Extn (Accounts), Work Phone (Accounts), Work Phone Extn (Accounts), Email (Accounts), Website (Accounts), Account Manager, Account Team, Industry (Accounts)
Contact Fields
First Name, Middle Name, Last Name, External ID (Contacts), Address Type (Contacts), Street1 (Contacts), Street2 (Contacts), City (Contacts), State (Contacts), Zipcode (Contacts), Country (Contacts), Title, Source (Contacts), Home Phone (Contacts), Home Phone Extn (Contacts), Fax Phone (Contacts), Fax Phone Extn (Contacts), Main Phone (Contacts), Main Phone Extn (Contacts), Mobile Phone (Contacts), Mobile Phone Extn (Contacts), Other Phone (Contacts), Other Phone Extn (Contacts), Pager Phone (Contacts), Pager Phone Extn (Contacts), Work Phone (Contacts), Work Phone Extn (Contacts), Email (Contacts)
* Note the Main Phone is the preferred phone number type for imports. This is the primary phone field displayed on all forms.
Using the Default Account Import Mapping and Sample CSV file
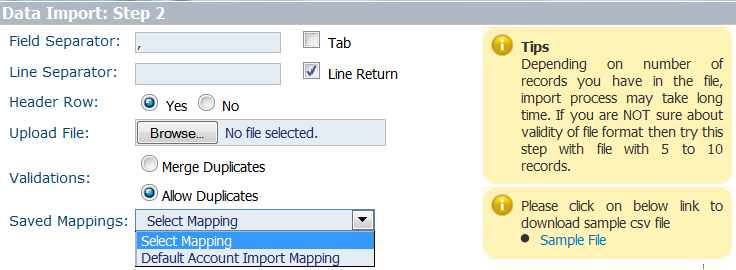
A sample import file in Excel format is attached to this article for your convenience. See Article Attachments. You can also download this file in Comma Separated Values (*.csv) format by starting the import in Commence OnDemand and click Next to go to Data Import: Step 2.

The fields in this sample file are listed below.
- Fields shown in bold text may not be left blank.
Account Name
Street1 (Accounts)
Street2 (Accounts)
City (Accounts)
State (Accounts)
Postal Code (Accounts)
Country (Accounts)
Main Phone (Accounts)
Fax Phone (Accounts)
Mobile Phone (Accounts)
Email (Accounts)
Website
Account Manager
Account Team
First Name
Last Name
Title
Street1 (Contacts)
Street2 (Contacts)
City (Contacts)
State (Contacts)
Postal Code (Contacts)
Country (Contacts)
Main Phone (Contacts)
Fax Phone (Contacts)
Mobile Phone (Contacts)
Email (Contacts)
Creating a test CSV file from your data
If you choose to create your own mapping, then you should first make a sample CSV file using your data file.
To test your file, save a copy of the CSV file with a new filename. Then delete all but the first 5 - 10 rows. This smaller file will be faster to import.
When importing your sample into Commence OnDemand, do not select any saved mapping. Click Next and the fields in your file will be shown on the left side. The Field Names are taken from the Header Row of your file. If your file has no header row this will show sample data from the first row.
Column A acct name <==> (Account Fields - Account Name)
Column B first name <==> (Contact Fields - First Name)
Column C last name <==> (Contact Fields - Last Name)
Simply match each field in your file with the appropriate field in Commence OnDemand.
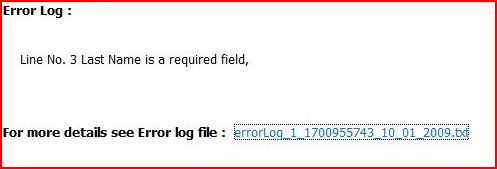
If there are any errors or blank values for mandatory fields, an error message similar to the one below will appear.
Failed to import <some number of> records.

If the CSV file still fails to import after making the recommended corrections, open the error log file shown in the error message. This will help you find the specific rows causing problems in the file. If necessary, specific rows can be cut from the file and saved to a new file to be reviewed and brought in at a later time.
Applies To
| Author: |
Commence |
| Tracking ID: |
|